Ornamental Plaster Sculpting, Mural Painting, Faux Finishing, and Imaginative Interior Design.

Ornamental Plaster Sculpting, Mural Painting, Faux Finishing, and Imaginative Interior Design.
CLICK ON THE RABBIT ( yes, those are cabinets) TO SEE MY PORTFOLIO, AND LEARN MORE ABOUT MY SERVICES...theartofthehome.com

Monday, April 30, 2012

In case you missed the shindig...


Betcha wish you woulda been here! 

A few of our guests are clients of mine, and some of them come every time we have an event at the barn.  This time, Sharon (right) brought her S-I-L Linnette (denim) to see what she ought to have me do to restyle her old garage into a party space. 

Lynne from We Cater To You kept our guests well fed. ( click here: wecatertoyou-mn.com)

Lisa hammed it up in the photo booth (shindigphotobooths.com) with her new husband Tom, then with Minnesota Officiant, Jim Albani (Minnesotaofficiants.com)  Who's Lisa?  She's barn owner, Cindy Faus Heimerl's cousin, and the bride of the day...

Lisa starting up the aisle.  When she's not busy getting married, she paints darling barn wood signs, including the table numbers on our tables, and a flower girl sign that I didn't get a good shot of, which read "Here comes the Bride"(that got a great reaction from the crowd).  You can "Like" Lisa Curry Designs on facebook to see them.
(Ha!  I just popped over to facebook and swiped this photo from Lisa.)
There we all are!  Check out the adorable flower girl's sign!

Back at ground level, the party carried on, even though the marriage was over as quickly as it happened.  In a gown from Saver's Thrift Store (!) and purple cowgirl boots (!!), the bride had everyone convinced, right up until the groom opted out of the kiss...silly boy, but I guess since he does have a sweetheart, it's understandable.   Though this one was mock, there are several weddings booked at the barn this summer, already, so if you're thinking of tying the knot at Rubies & Rust, click on over to the website right now (Rubiesandrust.com) 


Thanks to Sher Simon who snapped shots with my camera while I was busy playing bridesmaid.

If you missed this open house/barn, do plan to come next time.  We'll do it again in the autumn, no doubt, and it will only get more and more beautiful, as Cindy never stops collecting, arranging, fluffing and embellishing things.  Thankfully, it's not likely I'll have to paint any more walls, but there were those two chair seats that I upholstered and didn't quite get reattached...apologies to anyone who found my forgotten project!  Oops.

To see what I do when not playing bridesmaid (or Jill-of-all-crafty-trades) with my friends, click over to my website, theartofthehome.com

And y'all come back here Friday to see the other project I worked on much of last week.  It was for the Belle Plaine high school prom, and it turned out pretty wild!

Thursday, April 26, 2012

Open house...er...barn at Rubies & Rust this Sunday


Got plans for this weekend?  Come to a wedding!  Good gravy, NO, not mine!  But I'm a bridesmaid.  (Maid?  Ha!  Snort.  I've promised to behave this time, though.)  Who's the bride?  I can't reveal.  Apparently her mama doesn't know yet. (!?)  Who's the groom?  Now, look, just show up and find out for yourself.  We'll feed you, entertain you, and show you the coolest ever place to have a wedding or similar event.  
click: rubiesandrust.com, for more info.

Hey, what happened?  The last time I was at the barn, it was all perfectly fluffed and ready for a wedding.

Oh, I see.  In order to accommodate larger groups, Cindy cleared out the end she was using for storage, consolidated what had to stay and shoved it back twenty feet, then got it all cleaned and primed, so I could paint more faux stone.  Oh, goody.  I had almost recovered from the first eighty feet, which I painted last summer.  She swears this is as far as we're going.

This is why Cindy gets so much more done in a day than anyone else I know.  Does she stop to find a step ladder? Noooo.  Does she wait a second for anyone to come hold the thing, while she runs the screw into the post? Noooo.  Do we love her stubbornness?  Of course.

The heap of stuff is already getting put back in place, or rearranged.  Yes, of course the photo is strategically cropped, so you can't see how much we have left to do.  Come see for yourself, and be amazed by what we get done in the next few days.  Oh, except Cindy has to go officiate two weddings Saturday, so... it always comes together.  She's charmed that way.  And she has friends.

Gary Crosby Construction (garycrosbyconstruction.com) installed the balcony last winter, and since this photo, they've added a huge window, on the other end, to the front of the barn.  The chandeliers have multiplied, anyway, and sparkle all the more, in the sunlight.
Between barn walls and prom photo decor, my friends here in Belle Plaine are keeping me very busy this week.  Check back next Monday for photos from the open house, er, barn, and maybe Thursday, we'll have a cute prom post.   Hope to see you out here on Sunday!

Monday, April 23, 2012

Color on the walls...

When I was five, I wanted the Big Box of 64 Crayola Crayons, with the built-in sharpener.  My frugal mother agreed to a fresh box when she bought my first grade school supplies, but it was the little box of twelve, and a disappointing knock-off brand that was pale and waxy.  Why her youngest child needed six shades of orange was a mystery to her.  Mama, bless her heart, has as much as admitted that a crystal ball might have changed a good few things about my childhood (I think my childhood was fine, actually, as thrift and desire bred creativity).
They didn't have "macaroni and cheese" when I was a kid.  Periwinkle still would have been my favorite, with thistle a close second.  What was yours?

The past few weeks I've been working on a project that will show up on this blog sometime in May.  It's a larger job, including five faux finishes, six rooms, fifteen paint colors, and a tree with about a thousand leaves.  Okay, maybe only about five hundred leaves, but my boredom meter (permanently set when I was about three, apparently) insists it's more.  The colors chosen for the house range from maple butter, through the spectrum of greens and blues, to a brilliant grenadine red.  It even makes my colorful house seem a bit sedate...well, almost.

So how do you make this work, putting multiple colors in adjoining rooms, without it seeming choppy and disjointed?  Here are three tricks:

1.  Keep all the colors of the same intensity.  Usually, you can figure this out by picking colors from the same position on the sample strips at the paint store.  If in doubt, squint at the colors, and imagine them in a black and white photo.  They would all be the same shade of gray.


In the upstairs hall, the green plays nicely with the colors in each room.  Each color is of a similar intensity, so the eye travels easily across them.  The white trim is a base note throughout the house.

2.  Cross-pollinate from one room to the next.  Here in Belle Ami, the green of my foyer is picked up in the curtains of the front parlour...

The wall color of the parlour is an apricot not far off of the tones of the maple floor in the foyer, and moving the other direction, it is the base color for the ceiling in the adjoining dining room... 

The greens and deep purples of the living room floorcloth repeat in the chair and drapery fabrics in the dining room... 

Through the next double doorway, the greens, purples and apricots are picked up in the fabrics that adorn the window and ceiling of the drawing room (turned art studio).  Use lots of different shades, so you don't have to worry about matching...

Yes, this is the ceiling in my art and sewing room.
You need not match all the colors, just carry the primary color of one room into the next as a secondary or an accent color.

3.  Have a consistent base note running through the whole house, if possible.  Here, I have maple floors in every room except the kitchen and baths.  Shades of color that coordinate with the amber of my floors are likely to look good together.  I also have wide white woodwork throughout.  If you have a spouse who refuses to allow paint on that lovely ubiquitous oak trim, perhaps you can have a few pieces of painted furniture in each room, in a consistent palette of white, black, or a favorite hue. 

None of these rules are set in stone.  These are guidelines, meant to snap you out of color paralysis, and get you started living in full color, again.  Remember when you were fearless about color?  Remember when you boldly embellished your bedroom walls with the rainbow in your Crayola box?  Yeeeesss?  Okay, now get over the unpleasant bit that immediately followed that little adventure, even if your mama hasn't.  You're a grown-up now, and not only are there 96 colors in the big box, these days (yes, I own that one), there are thousands more colors at the nearest paint store, and you can pick as many as you like!

No instructions required.

Go splash some happy on your walls!  If you can't find the perfect shade of paint, try creating your own, or you can always hire me to custom mix it, whether that's in a can for plain painting, or on your wall in a blended finish.  My portfolio and all the info on how to hire me can be found at theartofthehome.com.

You can leave comments below, or feel free to email me at dawnmariedelara@gmail.com.  I'm happy to answer your questions, if I know anything I think might be helpful, so don't hesitate to ask.


Thursday, April 19, 2012

Taping off woodwork: It's boring, but somebody's gotta do it.


"I used tape, but it didn't work."  I hear that just about every week from someone else in line at the paint store, or from a client who has done some of their own work.  Has it happened to you?  How about I share a few professional secrets for masking off your woodwork?  Since Paul Romleski, from Buckets of Color, was painting the dining room next to the kitchen that I was faux finishing today, I asked him for his favorite tape tips.  Paul is the only painter I will recommend, so his advice is the best.  Not the most exciting subject, but I promise this info will make your next paint project prettier.

First, CLEAN YOUR WOODWORK.  Dust with a dry or slightly damp cloth.  If it's in the kitchen, or a place the dog rubs against, Windex will degrease, without damaging any finishes.  Do not use Pledge, polish or wax, as the tape will not stick to it.

Second, choose your tape.  I know you have tried what I'm about to recommend, and may have had bad results, so read all the way to the end, okay?

Just when you thought choosing color couldn't get any more daunting, you have to choose your tape color, too.
For most things, regular TAN painters tape is fine.  I like 3M, Paul uses a paint store brand.  I recommend against the hardware store house brands, as some of them are really bad. 

If you need to mask off fresh or possibly delicate painted woodwork, use the 3M BLUE with the ORANGE CORE.  There are lots of different blue tapes, and they have adhesion ratings, but the numbers are easy to mix up.  Just look for the orange inside.  Blue is also what I usually use for taping stripes or panels on freshly painted walls, by the way.

I am not a huge fan of GREEN Frog Tape, but I do use it on delicate surfaces.  Paul says their new yellow is really good, and especially if you are taping a corner where your paint is meeting a faux finished or papered accent wall.  It's sheer enough to see through, and tell if your overlap is even, giving you the best edge possible.  Some of the green tapes being sold are especially solvent resistant, so if you need something to use with lacquers and such, read the labels.

Now, here's the bit most people skip:  BURNISH THE EDGE of the tape, where it meets the wall.  Use a drywall taping knife(putty knife), a 5-in-one tool, or an old credit card, trimmed so it has a square corner.  Your fingertip or fingernail are neither one going to do an adequate job on the spots where it really matters.

Finally, pull the tape as soon as the wall at the edges is dry to the touch.  If anything snuck under, despite your best efforts, it will still be wet, but the wall will be dry, so a quick dab with a damp thin rag or paper towel will clean it right up.  If you don't pull then, give the paint time to harden (12-24 hours) before you pull the tape.  This will reduce the risk of the latex that overlaps from the wall onto the tape doing the stretchy thing, and leaving you shredded edges, which then must be touched up with an artist's brush.  If the tape breaks a lot when removing it, try reversing the direction you are pulling from.  Sometimes it seems to have a grain, and rips less when pulled from one direction than the other.

One more thing:  If you are masking a painted surface, be aware that if the previous paint job was done over an oily or dusty surface, or if someone put latex over oil base paint without the proper primer, any tape is likely to lift paint off.  Don't blame the tape.

I hope this was helpful.  Especially if you are planning to call me in a few years when you upgrade from plain paint to one of my specialty finishes, because as much as I hate taping, what I hate more is spending hours scraping the previous painter's messes off of the woodwork.  Don't make me hafta snarl at you.

If you are ready for me to paint something special now, you can see my portfolio and find the info on how to hire me at theartofthehome.com.

If you have comments or questions, just click the comments below, or feel free to email me at dawnmariedelara@gmail.com.

Monday, April 16, 2012

All in good time...


If you have read this blog for very long, you've probably figured out by now that I work as much, if not more, on intuition than by the rule book, when it comes to design.  I consider what I do a spiritual process, creating the perfect environment for the people who inhabit a space.  I don't claim to be a genius of design, but rather a channel for the Divine (as we all are, in our own way).  People know in their souls what they need, and I just translate.

I was recently asked to completely change the look and feel of a family room, for a couple with teen-aged kids.  I was super busy, so couldn't get to the job right away, but they weren't too concerned, and agreed at the initial meeting that as they were busy also, and about to leave on a trip, this would come together in "divine right time".  Usually, clients either have a pretty good idea of what they want me to paint for them, or I get a few pretty strong ideas, upon seeing their spaces, and asking a few questions.  Worst case, I might need a night or two to sleep on it.  Not this time.  They knew they wanted bright citrus colors, snack bar/soda fountain equipment, and some way to mask an unused sliding glass door.  They didn't have any ideas as to style, but they wanted something more design-wise than just nice colors and matching furniture, which is why they called me.

Wallpaper stripped, North Woods decorations removed.  Now what?

Colors, themes and the space would not coordinate though, no matter how many mornings I doodled, how many magazines I poured over, no matter how many hours I spent perusing Pinterest.  I finally gave up, which is something I've done maybe five times in my life. (Certain people would call me stubborn, but I think tenacious sounds much nicer, don't you?  Don't you?  Ahem?)

I arrived at our next meeting, a month later, ready to admit defeat, hating to let them down.  They were still confident I could design something special for them though, and wanted to know if I could incorporate something they brought home from Costa Rica... 

Clarity comes from a frog.  Especially perfect for teaching me this refresher in allowing things to unfold in divine right time, since frogs, being amphibious, symbolize the combining of the physical and spiritual natures.  Divine design, indeed.
The minute I saw the frog, I knew what to do:  A play on the market stalls and refreshment stands found throughout much of Latin America, with brilliant lime and mango walls, and a heavy dose of  "corrugated metal siding", a sample of which I happened to have with me.  A tropical smoothie shack hang-out, with a screen made of brightly painted wooden doors to mask the unused patio door, but still allow some light in... maybe shutters or awnings on the windows, oh, and galvanized details, like using pipe for the handrail, and simple barn lights, and... lots of details to pick up the flavor of this precious family adventure they had just returned from!  Suddenly, they were coming up with ideas as fast as I was.

No wonder I couldn't get a feel for their idea of the perfect get-away space, sooner.  They hadn't been there yet!  Divine right time.  You can't force it.

This project will actually happen in May, so watch for photos of the finished room, then.  I'm scheduling June projects now, so if you want to get on the calendar, check out my portfolio, and the information on how to hire me at theartofthehome.blogspot.com.

Comments can be left below, or you can email me at dawnmariedelara@gmail.com.


Thursday, April 12, 2012

Demilune (Half Moon) Madness...

Last week, my friends were blaming all kinds of things on the full moon.  While they ran around howling (yes, some most of my friends really are like that), I got an irresistible urge to rearrange furniture, and decided this table had to either be redesigned, or move to the basement laundry room.
This little Queen Anne table has been charming in the dining room, but she's a bit small for the room, not to mention dinner with more than a few guests.    Note to those who notice such things: I did not drip paint on the hardwood floors.  A previous owner refinished only the edges that showed around the area rug, then later, planning to install wall-to-wall carpet, didn't bother with drop cloths.  Refinishing them is on the endless list of things to do, though not very fun, so not very high up on the list.  :)
Years ago, when I moved from a tiny 1920's bungalow in Minneapolis, down to this big post-Victorian in Belle Plaine, I left much of my furniture for the young couple that bought my house.  I had visions of finding the perfect antique furnishings at estate sales, after the move, but several months, one electrician and a plumber later, I was out of furniture budget.  Thus, this little alley find (even smaller than the alley find I left behind) got a "quick" paint job, and stood in for several years as the temporary dining table. It also traveled to art shows as a display piece, and survived the scariest storm I've ever been caught in...Minwax Polycrylic, you rock, and hail and water roll right off of you!
My new larger table holds ten people for dinner, four friends working on art projects, or this week's woodworking project, as needed.
About a year or so ago, I picked up a larger Jacobean Revival style table off of craigslist, and this little one got shoved into a corner, where it fit, technically, but always looked awkward. I had an idea for making it work, and now that I'm fully embracing the conversion of the dining room (which is next to my studio) to full-time art space, I finally took the time (all of thirty minutes), to try it out.
Not all experiments work, so it's not a bad idea to snap a photo of the hardware before dis-assembling, just in case it turns out not to have been such a hot idea, after all.
 I think it works nicely...


I took the extension mechanism off of the bottom, and screwed some salvaged staircase spindles to the skirt.  I think I'll keep an eye out for back legs that better match the style of the table, but these will do until I find them.  I love the way this creates a perfect desk to hold art journals that I work on most weeks.
   and here's the other half...

The second half will make a nice spot to eat breakfast, when every other table in the house is covered in projects, which is most of the time.
Okay, truth:  It's the same half, for the sake of snapping a photo, and writing this post.  I couldn't put the back legs on the second half because the charger for my cordless drill died, so I borrowed the neighbor's cordless drill, but his battery died, too.  Sigh.  Blame it on the moon.

When I'm not chopping up perfectly good furniture to turn it into something else, I paint perfectly good walls.  You can view my portfolio of ideas, learn more about my services, and get the information on how to hire me at theartofthehome.com

Trying a D-I-Y project like this table conversion?  Yay, you!  If you have questions you think I might be able to answer, please know you are welcome to email me at dawnmariedelara@gmail.com.  I'm delighted to share whatever I know.  You can also ask questions or leave a comment by clicking that word, just under this post.

Monday, April 9, 2012

Easter with some of my favorite Peeps...

The typical start to an Easter Egg Hunt, right?  Yes, the shotgun to start it is typical, but something is missing...

Being a farmer, TC has Egg-sperience with a variety of eggs.  This one is of the egg-stra large golden (???) variety.  Don't worry, I don't let him pick your paint colors.  Neither does his wife, Carol, keeper of the list of hiding spots.  They are serious about this egg hunt thing.

Ahh, now that's more like it.  Here's the rest of the kids lined up for the egg hunt.  Oh, no, wait, we're missing Kate and Jesse.  Yes, they really hide eggs for the grown up kids, too...including me, this year (thanks Easter Bunnies).

Hmmm, how to caption this one?  "Bartender, there's a chick in my drink"..."Real men drink pink"...It only looks like Jeremy is drowning his sorrows in an Easter-tini.  This is actually his Sister-in-law Kate's annual strategy to sway the odds in her favor.  A yummy cocktail with a wicked kick served beforehand beats a hip check at the starting line any day.  Jeremy never seems to catch onto the trick.
There are lots of blessings to count this time of year.  Being included in the Fogarty family celebration is a big one for me.  Thanks, Dearhearts.  You're the best.

Now, back at Belle Ami...

Being the day after Easter, Midwestern schools are closed. As a special treat, Faithie let her younger sister Ava tag along to art class. It's tricky teaching siblings, as the younger tends to compare herself to the older, playing an impossible game of catch-up. I put them at opposite ends of the table, so they drew the same thing, but from different angles.

Faith is pretty accomplished at drawing what she sees, and even did a second drawing, pulling out the individual elements in a really cool graphic style piece, while Ava finished hers.

Ava, who is six, was pretty impressive at noticing details, like the fact that she could see her sister's hand through the windows of the fairy's punkin camper.  How to draw a big hand in a tiny window, especially a hand that kept moving, proved to be too frustrating for a first lesson.  She got lots of other details, though.

Faithie signs her masterpiece, impatient to get to today's project, paper puppets (which I forgot to get pictures of).

Ava finishing up hers.  If she reminds you a bit of Hilary Knight's drawings of Kay Thompson's "Eloise", you've got it about right. 
Now, I don't know if you noticed in the above photos, but the art room is getting pretty crowded, what with all the swell stuff it takes to make anything one wants, at any given moment.  Lots of materials, including china for mosaics, pounds and pounds of glitter, and a small selection of salvaged furniture, is arranged neatly in my semi-finished basement.  Fabric, paper, and the paints we use all the time need to stay on the main floor though, and there's more than fits in the room that was designated for studio space, seven years ago.  Life changes, and houses must change with us, so it's time to fully embrace the studio expansion into the dining room.  Work is underway...
Good thing I was invited up to my carpenter's house for Easter dinner, because this is what I had going on in my own dining room.  TC, in his big beautiful heated-floored work shop,  builds the big stuff for my clients, but he leaves the salvage furniture re-purposing to me.  My woodworking space is in the basement, but it's small,and it's usually easier to bring tools up, than it is to carry wood down, the old stairs.  What's coming on Thursday's blog post? ...notice the table on the left?...
Pop back Thursday to see what gets accomplished on the studio annex project, and pop over to theartofthehome.com, if you would like to see what I do when I'm not just goofing off.

Leave comments below, or email me, if you like at dawnmariedelara@gmail.com

Thursday, April 5, 2012

Feeding your soul, one beautiful morsel at a time...

  If you look through the arch, you can just make out the medallion on the ceiling in the next room.  Yup. that's the one I showed you last week.  Same house, next room, which happens to be a little walk-through butlers pantry, between the kitchen and dining room.  The original plan was that it would have a barrel vault ceiling, but other details in this rebuild job took priority, and ate the budget for this.
Trompe l'oeil plaster detail and sky ceiling above scumbled walls.
Jodi still wanted her sky, with some sort of architectural detail, though. Since I couldn't really fool anyone into believing a nine foot ceiling was barrel vaulted, I brought the sky down the walls to about where the vault would have been, to at least create the feel of it, then added a trompe l'oeil plaster moulding. Once the cabinets are complete and the chandelier in, I'll post a full picture of this little jewel box of a room.
It only looks 3-D!
Sometimes, the details we badly want in decorating our homes just don't fit in the financial reality we live with.  Paint and patience can often give you something just as good, and maybe even better, than what you were wishing for.  Even hiring me, this paint treatment saved Jodi a bundle.  If you want to tackle this yourself, but haven't painted something like it before, check out The Painted House Revisited, by Graham Rust.  He includes a great tutorial for this type of trompe l'oeil plaster.  It takes practice, but using artists acrylics, you can keep refining your shadows until you get it to pop into 3-D.  You can, by the way, also sculpt this from the paperclay that I have mentioned in previous blog posts, which, honestly, I think is a lot easier!

I've had people raise their eyebrows at putting this level of detail in a small room like this, a closet, or a bathroom.  I think this is precisely where these things feel the most luxurious and pampering, though.  Have you ever come across vintage clothes with exquisitely sewn linings of beautiful cloth, or opened a book to see gorgeous endpapers, and experienced the pleasure of the unnecessary detail?  For me, it's these little details that add layers of perfection to every day living, so I take the time to create them for myself, and I love doing them for clients who delight in the extraordinary, as well.  I hope you'll let yourself enjoy such things in your own home.  Beauty is not a frivolous extra.  Honoring yourself, and the Divinity within you, with beautiful surroundings feeds your soul!

My portfolio can be viewed at theartofthehome.com.

Comments or questions can be left by clicking on the word "comments" below.  Even if you're a die hard D-I-Y sort, and would never hire anyone like me to have all the fun, I'd love to hear from you.  Heaven knows I can't paint all the walls out there, and I don't mind sharing my secrets.

Monday, April 2, 2012

Sure I can do a little something to your photo...

Mostly for work, I paint big murals on walls.  Lately, going in a new direction, I make cool little collages for book illustrations.  Last week, the two worlds collided, when I answered a voice mail message about making an art piece out of a client's photo... 
Eiffel tower photo...before.
My client, Connie, had been given this huge print, by the graphics guy who does the art on their company vehicles.  They recently traveled to France.  Oh, wait, does that sound like I mean her and the graphics guy?  Oops!  I don't know where Graphics Guy got the photo.  Presumably not on the same trip as Connie and her husband.  Are we all clear on that, now?  Good.  Let's start over...

Since Connie and her husband had recently been to Paris, she loved the idea of using this photo to anchor a grouping of her personal photos on their living room wall, which is roughly half the size of Texas.  The only problem was that the photo was too bright blue, and too, well, modern.  She knew who to call.
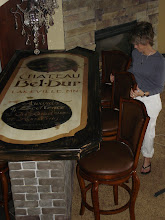
Eiffel Tower photo, altered with gel medium, texture medium, tissue paper, acrylic paint, and kraft paper.
Her first thought was that perhaps I could tone down the blue, like she had seen done on a smaller print at a home decor store.  She snapped me a photo on her cell, but on closer inspection, I realized that the artist had actually done a lot of embellishing over the photo, even adding strips of wood.  Connie didn't want that much dimension, but she liked the idea of adding some sort of texture, and maybe a vintage postcard or travel poster. 

Eiffel Tower altered photo close-up.
 Since I had some real vintage postcards in my stash, from the days when the original lettering was done by hand, it was easy enough to duplicate it, on a giant scale, down to an authentic name and address not to be found in any clip art anywhere. I added texture first with tissue paper, then with texture medium trowelled through a large scale stencil from Royal Design Studio (they have lots of really cool designs! click here to check them out: royaldesignstudio.com). I brushed in both ochre and blue paint, then scumbled on umber glazes, until it said it was finished. Once it's framed, I'll post a picture of it in her living room, where it looks even better than either of us imagined. I love it when things come out exactly right!


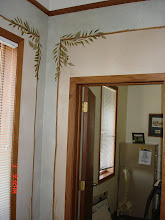
I also love it when I hear that my work has made other people happy.  I did a color consultation awhile back for Prairie Oaks Institute (prairieoaksinstitute.org), an organic farm educational center, just outside of Belle Plaine.  I don't really have the time or desire to go help weed their gardens (hell, I don't even weed my own), but I'm happy to help with things like picking colors for the farmhouse.  I intended it to be a volunteer thing, but when I popped over there on Saturday to see if they were ready for the next phase, I was told that folks using the overnight facility were glad to see I had saved them from beige, and I even got paid a little bonus...


What's in your wallet?
And speaking of eggs and France, would you like to meet a friend of mine?  Well, actually, she's in Belgium, which is just north of France, reporting for NPR.  Usually, she interviews foreign dignitaries, UN advisers, and guys like Colin Powell.  This week, it was her neighbor's chickens...Teri Schultz for NPR.  I wish I could show you a photo of her from our childhood.  She and I once made a giant chicken parade costume, that laid eggs.  Not sure how that led to her career choices, but the route from that to where I am now is pretty short!


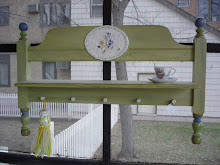
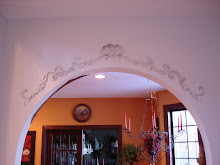
This little balcony is the newest addition to the rustic elegance that is Rubies & Rust
 Oh, and as long as we're wandering from one topic to another, speaking of chickens brings up thoughts of barns, and that reminds me that I should let you know the next Rubies & Rust Wedding Barn open house is coming up on April 29th.  Unable to convince me to get married again (I haven't met one I'd share toast with yet, nevermind a lifetime), Cindy is looking for a couple to have their ceremony that day.  Interested?  It's free, and it's easy to enter!  Click here for info on the open house and the contest: rubiesandrust.com

If you would like to see what else a childhood of crafting paper mache chickens has led to, you can check out my portfolio of creative decorating samples at theartofthehome.com.

Questions or comments can be left below by clicking on the word "comments", or email me at dawnmariedelara@gmail.com.