 |
| GingerBelle! |
Gingerbread is a big Christmas tradition for me. Actually, it's about my only tradition, except for stockings (yeah, still). I don't have a big stash of sentimental ornaments, so I decorate my trees in different themes every year. I celebrate in different ways, depending on who I celebrate with. Growing up, I couldn't eat my family's traditional clam chowder, so I don't have a gotta-have-it Christmas meal. But I always bake gingerbread.
Most years, it's just cookies, but when I have time, I love making gingerbread houses. The largest one I ever made was a scale model of my parents Victorian era farm house, back when I was in high school. It was over 2 feet tall, had candy glass windows, and a light inside that glowed through them. My mother had visions of an architect in the family. I simply had visions of sugarplums (too bad Cake Wars hadn't yet debuted on television, or I might have had visions of becoming a sugar chef). Sorry Mom.
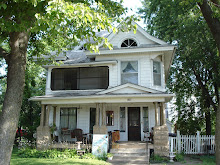
I've wanted to turn Belle (short for Belle Amie...yes, I gave my house a name...if you met her, you'd understand...) into a gingerbread confection for a few years now, and with the help of my Artgirl, Faithie, it finally happened. Faithie has made a couple of gingerbread houses herself, and is something of an expert on candy, or at least emptying my candy jar, so she was the perfect partner for this venture. After some initial sketching, brainstorming, and measuring, we figured out the recipe:
Frosting. Batches and batches of frosting.
Faithie and I tried spray foam insulation to make frosting, but the foam was difficult to spray in the shape desired, and one can only made a single strip. We needed 25. Not friendly to the budget nor the environment, so we nixed that. I had a mountain of recycled muslin panels, and I knew dipping fabric in paint would make it shape-able. It took a few tries to come up with something that looked like frosting and didn't take more than 15 minutes per segment to shape. We tore the muslin into 18 inch wide by 15 foot long strips, dunked each into slightly thinned paint (which I mixed from "Oops" paint and job left-overs, then tinted), then scrunched them with our fingers on a plastic sheet laid on the dining room table. There was only room for six pieces at a time, and each batch takes several days to dry, so as usual, Thanksgiving dinner didn't happen here.
Candy. You need lots and lots of candy
Lollipops and Candy sticks. At least a few.
Elves. Faithie said we had to have elves...and a sign...
We intended to make three elves, but they take a fair bit of time to construct. Also, I had only one mannequin head, and no desire to sculpt heads from scratch for this, two months being all the time I had for the whole project. The basic idea is to create a stick figure from stiff wire, including fingers, and with a long neck. Use duct tape to hold strands in place, as needed. Insert the figure into the sleeper, and stuff with batting. Put a little padding in the fingertips of the gloves, and wrestle them onto the hands. If you were making a more permanent soft sculpture, you would wrap the wire in batting and muslin strips and stitch things in place. That's a whole different thing. This is Prop Making 101.
To dress the elf, the tunic is a rectangle with a slit for the head cut in the middle, edges trimmed. The hood is another rectangle folded in half, trimmed a bit in back, and hot-glued along the seam line. Shoes are made of three pieces of fabric, hot glued rather than stitched. to save time. Everything was belted with ribbons, and the hood was pinned into the head to hold it in place. Oh, the head! I did shape it a bit by pressing a paint brush handle into the foam, then I painted the face, and glued some craft store feathers on for hair. I drilled a hole into the neck and pushed it onto the wire neck of the body structure. Don't glue if you want to be able to turn the head. She's wired onto the ladder for wind (and prankster) resistance.
You should note that as far as paint for this project goes, we didn't worry about interior/exterior/house/craft. Any acrylic will hold up fine unless you're in a really rainy climate. I've painted quick "temporary" signs from interior wall paint and craft paints which got left out for years, year round. Use what you have, or what you can salvage.
So there's our recipe for a gingerbread house. We'll add a few ingredients next year, since there were a few things we didn't have time for. Also, the attic windows didn't get any frosting, mostly because I've never opened them, and I thought it perhaps best not to test the old hinges and latches in the dead of winter. See, I think these things through. Well, most things. Like, I thought to put the second storey frosting and candy up before the roof got snowed on....just didn't really think about needing to get it down from the snowy roof in January. Hmmm... If we don't get a January thaw, I may be taking it down around St. Paddy's day! Fa-la-la-la-leprechaun!
 |
| Mix 25 strips of muslin into 4 gallons of thinned paint, shape as desired, and let dry for three days. May need to be made in batches, if space is not unlimited. |
Candy. You need lots and lots of candy
My goal was to make everything for this project from stuff I already had. Unlike most folks, I used to work in the event industry creating theme party decor, so I happen to have a large stash of stuff like Styrofoam. All the mints, M &Ms, and candy canes were made of Styro. If I'd not had this, I'd have gone the stitched-stuffed-and-painted muslin route. Once shaped, and once you vacuum off all the styro bits clinging tenaciously to your clothing, the round candies are painted. However, to create the stripes on the candy canes, I dipped a few yards of muslin into red paint, spread it out flat to let it dry, cut it into strips, then pinned those onto the canes. Waaaayyyy easier than painting spiral stripes on styrofoam.
Gumdrops. Faithie wanted gumdrops.
Lollipops and Candy sticks. At least a few.
 |
| It's not child labor if her parents are paying me to teach her stuff, right? What, you never used a post hole digger in art class? |
Elves. Faithie said we had to have elves...and a sign...
 |
| Work? Play? Eh, same dif. |
We intended to make three elves, but they take a fair bit of time to construct. Also, I had only one mannequin head, and no desire to sculpt heads from scratch for this, two months being all the time I had for the whole project. The basic idea is to create a stick figure from stiff wire, including fingers, and with a long neck. Use duct tape to hold strands in place, as needed. Insert the figure into the sleeper, and stuff with batting. Put a little padding in the fingertips of the gloves, and wrestle them onto the hands. If you were making a more permanent soft sculpture, you would wrap the wire in batting and muslin strips and stitch things in place. That's a whole different thing. This is Prop Making 101.
To dress the elf, the tunic is a rectangle with a slit for the head cut in the middle, edges trimmed. The hood is another rectangle folded in half, trimmed a bit in back, and hot-glued along the seam line. Shoes are made of three pieces of fabric, hot glued rather than stitched. to save time. Everything was belted with ribbons, and the hood was pinned into the head to hold it in place. Oh, the head! I did shape it a bit by pressing a paint brush handle into the foam, then I painted the face, and glued some craft store feathers on for hair. I drilled a hole into the neck and pushed it onto the wire neck of the body structure. Don't glue if you want to be able to turn the head. She's wired onto the ladder for wind (and prankster) resistance.
You should note that as far as paint for this project goes, we didn't worry about interior/exterior/house/craft. Any acrylic will hold up fine unless you're in a really rainy climate. I've painted quick "temporary" signs from interior wall paint and craft paints which got left out for years, year round. Use what you have, or what you can salvage.
So there's our recipe for a gingerbread house. We'll add a few ingredients next year, since there were a few things we didn't have time for. Also, the attic windows didn't get any frosting, mostly because I've never opened them, and I thought it perhaps best not to test the old hinges and latches in the dead of winter. See, I think these things through. Well, most things. Like, I thought to put the second storey frosting and candy up before the roof got snowed on....just didn't really think about needing to get it down from the snowy roof in January. Hmmm... If we don't get a January thaw, I may be taking it down around St. Paddy's day! Fa-la-la-la-leprechaun!
 |
| Artgirl, a.k.a. Faithie. Best elf. |
 |
| I love this kid! |
So, yes, I'm back to blogging. Check back here next Monday for a peek at my Christmas tree, if this wasn't sugar enough for you. In keeping with the sugarplum vision, I covered this year's tree in cupcakes, candies, ice cream cones and cookies. It's almost as sweet as Artgirl.
If you're wanting sweet paint for inside your house, check out my portfolio of possibilities at theartofthehome.com. I'm still booking January paint dates.
Questions or comments can be left below, by clicking where it says comments.
I took the in-progress shots, but Steve Isles was kind enough to come down from Jordan and shoot the afters, including pics of Faithie and I together. Of course, it had something to do with it also being dollar burger day at Johanne's Bar and Grill, just around the corner. Whatever the motivation, thanks Steve!















No comments:
Post a Comment