
 |
| base coat, roll on glaze, smoosh with a plastic bag, repeat very quickly to avoid dark lap marks |
However, if you have a room in which the newest of four patterns of wallpaper was applied prior to 1946, and you know the plaster under it is crumbling, you might (if you are as disinterested in tedious repair as I am) want to ask for paper.
I'm still working on the entry and living room, here in my own house, Belle Ami, but when I decided to steal a bookcase from the studio for the front hall, I knew I better take care of the studio walls while I had the room dismantled. For the cost of a gallon of glue (cheaper by far at the hardware store than the craft store, by the way), and six months of accumulated grocery bags (no, I'm not a pack rat, I was saving them
especially for this), you can create some interesting effects. I left mine simple, as paper arts are a passion of mine, and this is my art room, so having walls that are obviously torn paper makes me happy.
 |
| Rip bags, crumple and smooth, slather with thinned Elmer's, slap on wall, slather with more Elmer's, let dry, glaze with burnt sienna, then raw umber. |
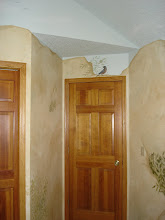
You can also get a realistic leather effect from brown paper. The trick is to glaze it first, in a rich brown, or leather shade of your choice, then once dry, rip it and decoupage it onto the walls. The torn edges will give the look of pieces of uncut rawhide. It can be done with wallpaper paste, making it "removable", but it still may be best as one of those last-resort-before-new-drywall techniques. You can do it over tatty panelling too, but do a quick fill of the grooves first with joint compound, and use white glue as your bonding agent.
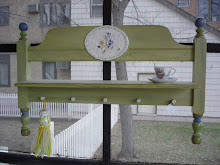
If you just can't get enough of it, or if you perhaps don't have enough grocery bags (or patience/time/desire???) to cover an entire room's worth of walls, this technique is great on furniture, too.
 |
| click pictures to enlarge, then click again for details |
 |
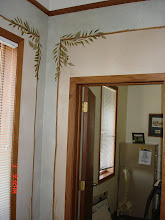
| Follow wall directions above, then embellish with scrapbooking diecuts, paper lace doilies, vintage magazine pictures, and painted swirls and words...or whatever else strikes your fancy. |
Makes a nice background for collaged and painted detail, plus it covers a multitude of surface issues, including chipped veneer, gouged leather, and deep scratches. And, of course, like anything leather, it just looks cool.
If you really want to try this, but need more detailed instruction, email me and I'll be happy to explain more, though there's really not much more to it. dawnmariedelara@gmail.com
Have you checked out the new website yet? theartofthehome.com
Have a wonderful, wonder-FULL, Thanksgiving! After dinner with friends old and new, I'll be spending the weekend building new studio bookcases to replace the one I commandeered for the foyer...pic's to come, of course!
Dawn-Marie (Quinche) deLara, Artist in Wonderland at The Art of the Home.


No comments:
Post a Comment