Ornamental Plaster Sculpting, Mural Painting, Faux Finishing, and Imaginative Interior Design.

Ornamental Plaster Sculpting, Mural Painting, Faux Finishing, and Imaginative Interior Design.
CLICK ON THE RABBIT ( yes, those are cabinets) TO SEE MY PORTFOLIO, AND LEARN MORE ABOUT MY SERVICES...theartofthehome.com

Monday, March 14, 2011

A story of brooks and butterflies...and a fawn named Dawn-Marie???


Woodland mural for little girls' room by Dawn-Marie deLara.  Click to enlarge, click again for details.
 Once upon a time,  two bright, beautiful sisters named Brooke and Ava shared a bedroom, a puppy named Ruby, and a love of hanging out in the work shed with their daddy, who is a landscaper.  This meant that their Daddy, Pat, was just as involved as their Mommy, Brenda, in the planning of this mural,  which included discussions of sedge grasses, understory plants, and a short debate about whether it was vital to be seasonally accurate (we all agreed, no, favorite things from spring through autumn are allowed to mingle). 
Ava and Brooke in their meadow.

The room is small, and has two beds.  Custom drawers were built beneath to accommodate clothing, so the dresser could be removed to make room for the main part of the mural.  This side of the room features a maple that extends across the window valance, and next to the door is a pin oak with a robin's nest and a marauding squirrel.  There are four butterflies around the room, one for each family member, and above one bed, two lines from a song the girls' grandma likes to sing to them. 

Just in case the beds ever move, small tufts of grass and ferns are painted in the corners behind them.  The girls got to help with this.  Brooke, who spent a lot of time watching me paint and keeping me company, painted some really nice grasses and ferns all by herself, and Ava painted something I think might be a spider wort plant, which is a far prettier plant than it's name suggests (yes, I tweaked her painting a tiny bit).

Realistic birds and animals will grow up right along with the girls.
  
Daddy requested a mama robin feeding her babies.

Mama wanted a bushy tailed squirrel above the door.

One of the girls gets to fall asleep beneath an oak tree and the words to a favorite lullaby.
The other sister sleeps beneath a branch of the maple, in the company of two chickadees.  The valance is artist's canvas stapled around the trim.
When it's time for bed, the girls like to pet the fawn and tell it, "Goodnight, Dawn-Marie." 
 Good night dear ones.  Pretty dreams!

Friday, March 11, 2011

Writer's block...

Any frame can become a chalkboard, with plywood painted and cut to fit.
Yeah, like the chalkboard says, I'm writing a book.  Not so much today.  Today, I tested the guestroom rug in the office, and then realized this meant the perfect curtains for the office were hanging in the music room turned dance/exercise studio, and the cabinets from that room would work great in the art studio if the extra studio table came up to the office to be used for spreading out book chapters in progress.  It's amazing when writing a book about decorating this house how hard it is to tell the difference between procrastination and designing for the book.

If you don't have a frame, paint one on the wall!
btw:  As for the quote, if you've tried and this still  isn't working for you, think of it this way:  try "yes, thank you!", instead of "pretty please can I?"
Both of these chalkboards are mine.  The one painted directly on the wall is in the kitchen, and used to hold the menu for the week, back when I cooked.  These days it holds inspirational quotes and reminders to buy peanut butter.  I used the other one (from the dining room) at an event recently, and was surprised by how many people still don't know that you can make your own chalkboards, or have heard of it, but think it requires special mystery paint.

Here's the scoop:  You can turn just about anything into a chalkboard.  If you use a bonding primer, just about any slick surface, including glass can be covered, but because there is going to be constant chalk abrasion, I prefer to replace mirror or glass in a frame with thin, smooth plywood (like birch) or Masonite.  As for the surface paint, any paint will work, but for best results, use an exterior grade paint in an eggshell or satin finish.  The new indoor/outdoor enamels are great.  Use a foam mini roller, and apply at least three coats.  Remember, this will be written on and wiped off a lot, so more than two coats is a good idea.
 
Don't have a frame?  You can always paint it straight on the wall, like my kitchen.  I painted a border to look like dimensional sculpted plaster, but you can paint on any style of border you like, or frame it in wall paper border strips, or skip the frame entirely and paint the whole wall.  Of course, by now, your creative juices are flowing, and it's occurred to you that you aren't limited to classic black or green, right?  Just choose a color dark enough to contrast with the chalk.

So then, today I've written morning pages (read The Artist's Way by Julia Cameron, if you aren't familiar with these), written a to-do list, written a fix-it list for my computer guy, written two quotes for jobs, written on my kitchen wall, and written this blog.  If my book is really going to debut in about eighteen months, I suppose I better go write something for it! 

I'd put it off til tomorrow, but  I'm off to Northfield to get photos of the woodland mural from a few weeks back, to show on Monday's blog. Sadly, tomorrow also happens to be the annual St. Patrick's Day March of the Clans in Belle Plaine, so I'll be missing out on two of my favorite things:  bagpipes and men in kilts.  Sigh.  If you're in the area, kiss a leprechaun for me!

Wednesday, March 9, 2011

Inspiration: French Accents Rugs and Tapestries Inc.

While we're on the topic of ceilings, (of course you read the last post) here's another one of Belle's. 

Medallion patterned ceiling, inspired by an Aubusson rug
I did warn you in the last post that I'm a little obsessed with ceilings.  This one was inspired by an ad for a rug, though I simplified the pattern a great deal.
I left off the floral ribbons and filled in with my signature art nouveau scrolls.  Click for close-up.

Starting with their design, I pulled one shape and color, and tweaked it to work with the light fixture.
My shoulders were throbbing by the time I got this far, and I wasn't sure where I wanted to go with the pattern, so I left it alone for a couple of years.  I think I'll actually be adding some details to this in the near future, but I'm thinking pearls and seashells, rather than the flowers and ribbons of the inspiration piece.


I've been keeping clipping books since I was about four...I remember working on them during "nap time", which I think was just Mom's way of getting a break from my nonstop imagination, insisting I take some quiet time behind a closed door.

Since the inspiration clipping is about 1" x 2", and impossible to photograph, I looked them up online.  www.farugs.com  Do check them out.  They have some seriously beautiful pieces.
As you can see, the magazine clipping is mounted to a scrapbook page.  I do this with favorite clippings, creating one-of-a-kind inspiration books that I refer to when a design or project won't gel.  Sometimes it helps to see how someone else balanced a color, or combined mismatched furnishings.  It's not about copying someone else's look, but clarifying my own preferences.

I always have design clients pull magazine tear sheets, and I keep files of them to share, but for myself, I do go the extra step of pasting them into books.  It's fun to look back at the ones I did in high school, full of first apartment ideas, legwarmer fashions, and Lady Di haircuts!  And just about the time I think my style has evolved, I discover that legwarmers are back in, and I wonder if the extra fabric at the calf wouldn't balance the extra padding on my thighs!  Okay, maybe not.  To erase that scary image, I'll leave you with one more ceiling.  This is the closet of the room featured above, with a tent stripe pattern that picks up on the fan motifs from the corners.

even closets deserve pretty paint

Monday, March 7, 2011

Inspiration: Robin Brown/Magnolia Pearl

This Sunday, I finally got a day to work without interruption on my home, Belle Ami.  I was tempted to paint a mandala design on the office ceiling (inspired by Ann Viveros), but I've been fairly immersed in paint for weeks, and besides, I still hadn't finished the art room ceiling, which I started quilting a couple of years ago.  Okay, it's not quilted in the traditional sense, but covered in fabric in the style of the crazy quilts that were popular around the time the house was built.  I know, normal people put quilts on beds.  Did I ever say anywhere that I'm normal?

A crumbling lace tablecloth was Fabri-tac'd onto a gold tablecloth, and then stapled to the ceiling with strips of crazy quilted fabrics, embellished with new and vintage ribbon, pillow case lace, and silk flowers.
Now, I can't claim to have thought this up entirely on my own.  I was inspired by Robin Brown, the fabulous textile artist behind magnoliapearl.com.  In her book, A Bit of Velvet, A Dash of Lace, she covers a wall in her Bandera Texas home with salvaged bits of old hand knotted carpets.  I loved the rich texture and sheer unexpectedness of this, but having searched for affordable old carpets to layer on my floors for a couple of years, I had only come up with one, and I didn't love the colors.  Besides, I didn't have a wall that could use the treatment.

However, I did have a damaged ceiling in my studio that needed either replastering, or a fresh layer of Sheetrock over it, and (oh, big surprise) absolutely no desire to do such tedious and laborious work.  And in that same room, stood a mountain of fabrics bought for projects that somehow never quite got done, and  sample fabrics collected for clients.  Having done a fair bit of crazy quilting back in the late eighties, it wasn't a big leap from carpeted wall inspiration to crazy crumbling plaster solution.
Crazy quilted ceiling in Dawn-Marie deLara's art studio...oh, yeah, that's what I did with the gold tablecloth...wondered why I couldn't find it in the drawer!
So, now that the art room ceiling is done, perhaps I'll take a break from working overhead before tackling the mandala design on the office ceiling.  This idea was inspired by spending a couple of hours on Saturday morning with Ann Viveros visiting Kingsway, a retirement home here in Belle Plaine.  Ann led a group of memory care patients in a mandala painting exercise (on paper, not the ceiling.  They're memory challenged patients, not ceiling-obsessed decorative artists), and she invited me to join them.  I bravely said "yes", though after last week's stupid brains, I was not entirely sure they would let me back out of the facility!


Mandala painting by Ann Viveros
I had a great time trying to loosen up and let the paint flow, and was surprised by how difficult something seemingly similar to my own work could be.  The more casual and simple I tried to keep it, the harder it was!  I also had the pleasure of having some interesting conversations with some amazing women, and came away changed forever.

A selection of Ann Viveros' work is on display at Kingsway in Belle Plaine, MN
My grandmother lived more than seven years with Alzheimer's disease, long after the memory loss was so severe that she really couldn't do anything but sit and watch life pass by.  I've lived most of my adult life with a buried dread of someday finding myself in that state, or headed towards it, and thinking how awful to live long past the time of feeling useful. Thanks to a beautiful woman who was a concert violinist, I was reminded of what I already know, and have said more times on this blog than I can count...You never know how you touch the lives of others.
web.me.com/annviveros
This woman didn't just convince me that any human being can be taught to sing (barring physical defect), and give me a mini-voice lesson.  In so doing, she made me realize that even if we should ever get to the point where we don't remember having met someone five minutes earlier, it doesn't mean we can't give them something of value.  I have lost my biggest fear about growing old, and I can tell you that this isn't insignificant.

Because I have lost a core fear, I am changed at depth, and this now changes my interaction with everyone I come in contact with, in some indefinable way.  A friend once told me that to be significant, one had to be like Jesus or Michael Jackson, and I wasn't sure how to debate it, though it seemed off to me.  I think the error might be in confusing fame with significance.  We all affect far more of the world than we are ever aware of, regardless of whether our name is ever known beyond our own circle of friends.  This violinist touched countless lives with her music, and now because she changed me, she touches every life I touch...not to mention all the people who will one day not cringe when I open my mouth to sing and the notes come out right!

So tonight I wish you peace, inspiration, and the wisdom to know that if you are present on this planet, you are significant. 

Saturday, March 5, 2011

Life through a smokey haze

Where do artists get their ideas?  Short answer, "Life".  Longer answer..."Life."  This week, I was inspired by a picture in a magazine to create a smokey finish in a  home theater space for returning clients, Sarah and Randy.  It wasn't just inspired by the magazine picture, though.  It was also the swirls I painted on a cabinet door for them a few weeks back, which were inspired by the swirls in their wrought iron candle sconces...

These cabinet doors have a black crackle/blackrub finish over dragonfly metallic basecoat, finger swirled to coordinate with wrought iron sconces on a nearby wall.
...And it was the charcoal-y black undulating lines of the buildings in the Michael Birawer artwork that hangs in the room...

Sarah and Randy thought these walls were too blue of a gray, and too boring, once we finished other nearby rooms.
 ...And even the smokiness in both their southern voices when they call me "Sweetheart".   Inspiration's always a blend of dozens of things, some obvious, some nearly indefinable, some undiscovered until the job is done and I step back to look, only to realize that the songs running through my head all day somehow showed up, if you know what to look for.

This smoke haze glaze will set off the client's art, once the walls are dry enough to hang it back up.


If you want to replicate this, it's four shades of glaze (black, burnt umber, elephant skin gray and white), over a medium blue-gray basecoat.  Song choice is up to you.  Needing to keep to a budget, I used a Woolie, with a bit of wrist-flip to create swirling patterns, rather than a finer grained glazing with cheesecloth.  Up close, this means there is a coarser pattern, but it wasn't so important that it look just like smoke, but that it have the essence of the idea.  As with all glaze techniques, you have to work fast to avoid lap marks, but as long as you keep the long swirly lines happening, you can disguise the occasional heavier spot with a wisp of white, so don't be afraid to try it.

Smoke haze glazed walls.  click for close-ups.
btw:  Some of you know I am pretty picky about my name, but I'm prone to calling my friends "Darlin' " and "Sugar", myself, so if you want to shorten it from Dawn-Marie, calling me "Sweetheart" is always good with me! ;)

Wednesday, March 2, 2011

Party Fare from Belle's Kitchen

At last week's "Gathering of the Goddesses", a ladies night event put on by Keystone Women's Circle (click here to see who we are), we served some pretty tasty fare from Tastefully Simple, as Keystone member Lisa Fahey is a TS rep, and a few things from my own repertoire, as I was teaming up with Lisa to teach "simple tricks of table scaping", in our 30 minute time slot.  The presentation focused on simple tricks to theme a potluck buffet, and basics to keep on hand to be able to put together a stylish spread, without using disposable party decor.  While our event had a Mardi Gras theme, we included some Easter ideas, since that's next up on the calendar, and we tossed in a few cooking tips that relate to potluck buffets, too.


Deviled eggs on a vintage serving plate...make extras if you expect this to serve more than three people!
Deviled eggs are classic potluck fare year round, and I happen to know a few tricks to make them both easier to fill and to transport, not to mention prettier.  I would give you an exact recipe for deviled eggs, but I don't have one, and trying to measure it out tonight mucked up the flavor, so if you don't have a recipe of your own, here's the general idea:

Hard boil as many eggs as you like.  Using eggs that are at least a week old makes them likely to peel easier.  Also, I peel them while hot, cracking the shell and peeling them under cold running water.  The shell slips right off, and any little bits are rinsed away.  Cut the eggs in half length-wise, and pop the yolks out, into a sieve.  Most recipes say to mash with a fork, but pressing them through a sieve gets them smoother, quicker.

Mix in enough mayonnaise or sour cream to make a very thick paste (about 4 parts egg yolk to 1 part mayo/sour cream), blend in some pickle juice and mustard, plus herbs or other seasonings of choice.  My friend Carol adds Worcestershire sauce, I add habanero sauce and fresh dill.  You want to end up with a tasty filling the consistency of cake frosting.
Now, instead of spooning this into the egg halves, like your mama probably taught you, spoon it into a disposable pastry bag, fitted (if you wish) with a coupler and 1/4 inch star tip.  You can skip the coupler and tip, and just snip the tip of the bag to about a 1/4 inch hole.  If transporting the eggs to a party, gently layer the whites into a carton, put a twist-tie on the end of your pastry bag of filling, and tuck it into a plastic bag, to keep it clean, and don't forget to bring along a serving plate.  It's way easier to fill them there than it is to transport them without the little devils slipping all over their carrier, even the ones designed just for them.
For the easiest and prettiest deviled eggs, fill with a pastry bag
When you are ready to serve, arrange the whites on a plate, and pipe the filling in.  If you don't have a deviled egg plate, any plate lined with lettuce will look beautiful, and keep them in place.

Garnish with a sprinkle of dill or other herbs.  In the summertime, use snippets of fresh herbs to make them really pretty.

I know, you Goddesses who were at the event already got all that, and are just checking the blog for the Pinarita (pineapple margarita) recipe.  Hang onto your Mardi Gras masks, already, I'm getting there. 

Pinarita for one:

1 oz tequila or sauvignon blanc wine
2 oz pineapple juice
1/4 cup fresh or canned pineapple chunks
1/2 oz triple sec
1/4 oz lime juice

whir in blender and serve over ice, or blend with 1 cup ice.  A salted rim on the glass really enhances the flavor of this drink.

Our party version:

1 bottle sauvignon blanc wine (or 3 cups/24 oz tequila)
1 48 oz container pineapple juice
1 whole pineapple, peeled, cored, and cut into cubes
1 1/2 cups triple sec
3/4 cup lime juice

Blend pineapple chunks with enough juice to process easily.  Put all ingredients in a punch bowl, stir frequently, and serve in ice-filled glasses, preferably with salted rims.

We served our pinaritas with lots of laughter, and a few bourbon-glazed chicken wings, shrimp with zesty lemon dip, chips and mango salsa, beer bread and garlic dip, a veggie platter, deviled eggs, and a key lime fondue with fruit and pound cake to dunk.  As long as you have lots of laughter, all the other stuff is optional!

Monday, February 28, 2011

Posting resumed...sort of.

Okay, I'm temporarily up and running with a borrowed laptop, but without photo editing software.  Without the ability to crop and sharpen images, I'm not sure I'll have anything worth showing, but I'll do my best.  I finished the woodland mural today, but thinking I didn't have the camera with me, I didn't get final photos.  After arriving home and searching everywhere to no avail, I unloaded the van, and found the camera had sifted to the bottom of the tool tote...aaarrrggghhh.  Honestly, I had stupid brains all day, so this was not a total surprise. 

It really wasn't a bad day, quite pleasant in fact, just absolutely brainless. I think I'll head for bed and see if a good night's sleep makes for a brighter day tomorrow.  In the meantime, I'll leave you with this image of Brooke, the older of the two sisters who share the room.  Both girls got to help paint a few plants.  Yes, even two-year-old Ava.  Her painting picture, as well as final shots of this room will be posted in two weeks, when I have a photo shoot/play date scheduled with these new friends.
My other rule:  Yes, you can color on the walls!

Check back Wednesday night for recipes for some of the goodies served last week at the Keystone Women's Circle ladies' night event, "The Gathering of the Goddesses".  Can I tempt you with a pineapple margarita?

Tuesday, February 22, 2011

New Posts Coming Soon

Lots to blog about these days, but my old computer keeps catching bugs, or something, and has crashed again (this quick post being done from the library).  I have a computer on loan, but not the right cord to hook to the dsl box...grrrrrrr.  I may find one yet today, otherwise, posting will resume when I have time to computer shop in a couple of weeks.  Yes, this means I am booked and busy!  Today I'm off to start a woodland mural for two adorable little girls...photos to come (soon,I hope!). 

Hope winter where you are is treating you nicer than it's treating us here, though I must say I am very grateful to the anonymous folks who keep clearing my 75 foot long sidewalk, and to Prairie Farm Supply for keeping my driveway plowed.  We're on track to post the second snowiest winter in recorded history...yikes.

Monday, February 14, 2011

Ahhh, love.

Conversation Heart cupcakes


What's your Valentine tradition?  Most years, I make Conversation Heart cupcakes (No heart pans required.  Just fill the papers 1/2 full, then before baking, slip a marble between the paper and the muffin tin, and create the point when you frost).  This year, being very recently single, and having also just had a major misunderstanding with a friend of the opposite sex, I have a bit of an attitude.  I made the usual words for my Keystone sisters and the Artgirls, but I had fantasies of a second batch, of a darker variety.  However, I found it difficult to express most of my thoughts in just two or three words. 

Sometimes, KISS ME, just isn't the sentiment a girl wants to express.


I did manage to shorten "Your oversize ego is truly astounding" to "Bite Me", but the rest just sounded more hostile than I honestly feel, and besides, it's not as if I was actually going to give cupcakes to the people who inspired these wicked phrasing fantasies.  Maybe Necco, the candy company, could run with this, and do them truly dark, in either chocolate or licorice flavor...expect to see them in retail locations where ID is required.

Now, getting back to the love...

Faith decorates her family home for every holiday,
 and made this pillow for the living room.

Faith (architect of the amazing gingerbread house back in December), wanted to do a simple project for Valentine's Day, using some red corduroy from my stash (aka Fabric Mountain), so she designed this heart pillow, and learned two new embroidery stitches for the words.

The story of the other project this week is a bit longer...

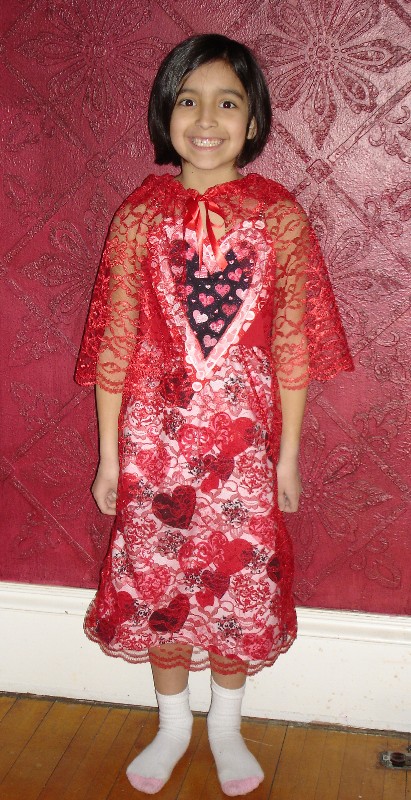
(Once upon a time)When I was a kid (a pretty long time ago), sewing your own clothes was still fairly common, especially for small town teens.  These days, few kids sew, especially kids as young as my art students, but just like basic carpentry, basic sewing is a valuable life skill, and a great thing to have in your art technique arsenal.  So, when eight-year-old Kadence proclaimed herself the next Miss Thing in fashion design, and continually drew the same dress, perfected a bit each time, I thought (and said), "Why not?"

Um...maybe because Kadence has only ever sewn three straight seams to make a super-hero cape.  Maybe because she's eight, and most kids that young don't have the attention span for this kind of thing.  Maybe because you are supposed to start with store-bought patterns, and kid-level projects.  Hmmm.  Sounds like rules from the Perfection Police.  I have two rules in my house:  #1.  Leave your shoes on, because if you take them off, your socks will get dirty, and I'll be embarrassed, and #2.  If you don't like something, for God's sake don't eat it, or I just might serve it to you again. 

Harry S. Truman said, "I have found the best way to give advice to your children is to find out what they want, and then advise them to do it."   I can't quote you anything else Truman said, but I could love him just for this.  I mean, really, how stress-free for the parent, not having to devise complicated smart advice, and how freeing for a youngster to be trusted to have relevant ideas of her own.  So, we don't do things the usual way around here, we don't think the usual way, and none of these Artgirls is expected to be the "usual" eight or nine year old (you get what you expect, folks).

Kadence and I brought her drawing to the fabric store, where she chose about twenty possible fabrics, found an empty cutting table, and draped and tested until she narrowed it to just six.  There would have been just five, but a floor sample with a lace overskirt caught her eye, and the design was further perfected.  The next week, just like a professional designer, Kadence made a muslin test of each part, where she realized the very straight skirt was a little tough to imagine walking in, much less monkeying around on the playground, and also that there might be a useful reason to learn fractions in math class.


We did a couple of extra days together this past week, finishing her creation, as her fabric choices were very heart themed, and she wanted to be able to debut the dress at school on Valentines Day.  Kadence sewed everything herself, except the elastic in the waist band, which required a bit of finesse to match it to the three fabrics that converge at that point.  She never once complained about having to do boring parts like pinning or pressing, and even when she scorched a fingertip, she pushed on, then added a lace cape at the end, even though she was butt-draggin', eyelid-droopin' tired. 

Kadence designed and sewed this dress,
including a 3-layer appliqued bodice,
 and lace overskirt, with matching cape. 
Click to enlarge, click again for details.


Yes, she's breaking the shoes-on rule,
but multiple test-fits are not compatible with
snow boots.

She's eight, folks, so next time you come up against a challenge and think maybe it's just too hard for someone like you, remember Kadence, and remember: 
You get what you expect. Expect big things of yourself, and you will be pleasantly surprised at what little ol' you can do. 

I get paid to (re)learn these things every week. Gotta love that!

Friday, February 11, 2011

If you could do anything in your home...

One of the best things about my job, besides great clients who feed me, give me cool cast-off furniture they don't want anymore, loan me their children, and pay me to splash paint on every conceivable surface of their homes, is the opportunity to try ideas that might never make it into the mix in my own home.  Sarah and Randy called me in last fall, to see if I could paint their builder oak cabinets, and do something fun to the back splash.   We did something fun to nearly every surface in their house!
"Black Ember" hand rubbed finish on cabinets,
 vintage silver s&p knobs,
 and "bolted barn metal" back splash.

Sarah had seen the creamy white MacKenzie finish on a friend's cabinets, and wondered if we could go a little darker in her kitchen.  Turns out, she had wanted black cabinets, but was afraid to even mention it, for fear it would be too dark.  Luckily, I had a black-rub-over-red sample with me, so it didn't take long to discover she was keeping secrets from me.  Never keep secrets from your interior designer.  It gives her headaches, and gives you far less fabulous results than you deserve, if it goes undetected.

"Rusty Barn Metal" bolted onto the back splash...
or maybe that's just painted on
Sarah loves to mix bling and rustic, modern and baroque.  Once I realized that I could throw in baroque with her very contemporary furniture and accessories, we were off and running. 

Vintage salt and pepper shakers were drilled, filled,
 and bolted onto the doors for FUNky  knobs.
They asked if I could find interesting mismatched knobs in a decent price-point.  If I had actually charged for hitting every antique store in a 30 mile radius, I'd have seriously blown the budget.  As it is, I found some cool stuff for my own home, and met some really interesting shopkeepers, all while pretending to be at work.

Ya gotta have access to the right tools for some jobs.
Even I, Tool Girl, do not have my dream shop,
nor can I justify buying things I'll only use on occasion.
Everyone knows one guy with a great shop,
and if you can bake cookies, you can borrow his tools.
I happen to bake REALLY good cookies!
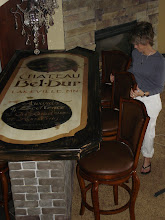

Black Ember cabinets, with vintage salt & pepper pulls
are the base of a very cool breakfast bar.
They had already decided to have a spray on surface done by another contractor to refurbish their Formica counters, but they wondered if I could do something really unique on their breakfast bar... 

Who says art has to hang on the walls? 
Counter tops are paintable, though this one is covered in canvas,
then painted, so it can move with them,
if ever they decide to head back to warmer climates.
Once I hung around the family for a few days, it became obvious that these are seriously fun people who love each other,  love good food, and at least one of them loves rock and roll.  If he wasn't busy in the medical field, he would have had to become a rock star.  If she didn't hit the gym several times a week, she couldn't indulge her not-so-secret passion for chips in all their infinite variety.  So, after looking at the art in other parts of their house, I came up with "When the party starts rockin', let the chips fall where they may."  An album of this title is flying from it's sleeve (of course we're talkin' vinyl, here!), to party with the spiraling martini glasses and dancing chips.  
"When the Party Starts Rockin',
Let the Chips Fall Where They May"
custom painted counter top.
Remember, you can click on the photos to enlarge, click again for details.
Once the kitchen was done, the adjoining spaces needed color and texture.  This wall finish is trowelled on paint, usually done to mimic plaster without adding so much texture.  Done in this color palette to accentuate their framed prints, it makes the whole wall an art installation. 

Trowelled paint in five colors was done on this
and a half-wall in the dining area.
With all the added color and restyling, the standard issue oak railings were really out of place, but the budget, which had to leave room for two bathrooms to be remodeled by other contractors, was really low.  When Sarah came home with a very ornate black crystal (ahem, plastic, but I swear you can't tell the difference!) chandelier to hang over her contemporary dining table, I knew we could actually use the classical styling of the railings to our advantage, and doing a distressed finish like this saves time and money on boring stuff like primer and perfect drip-free pint jobs.  The perfect solution at the perfect price.

Distressed black enamel over basic builder oak
gives a whole new look.
I like Benjamin Moore's Ironwood enamel...
whatever they've recently renamed it.


This armoire sports a new streaky teal and brown paint finish.


And custom knobs.


I went back to this job this week to touch up nicks, splatters, and other boo-boos from the contractors who came in behind me, and to get photos with the rooms all put back together, which I don't always get to do.  Of course, Sarah and I came up with two more projects, and I'm working on ideas for a cool paint treatment downstairs in the TV room, since that fresh pearly gray paint is just a little too tame...Hey Randy, I'll be back in a few weeks, in case you want to make me more of that fabulous guacamole!